Monday, September 1, 2014

Pumpkin Creme Brulee

Its Fall Ya'll!
 

   Happy first day of September, well the second day by the time I get this posted. Anyway I made this Pumpkin Creme Brulee for my moms birthday dinner. She loves Creme Brulee, and me being already in the fall spirit during mid August, I worked these bad boys up. A delicious pumpkin flavor with the smooth and decadent flavor of Creme Brulee, topped off with a cinnamon sugar topping.

Preheat that oven to 325.

1 Cup Canned Pumpkin Puree
4 Cups Heavy Whipping Cream
2/4 Cups Granulated Sugar
6 Egg Yolks
1 Tsp Pumpkin Spice Blend
1/2 Tsp Cinnamon
2 Tsp Vanilla Extract
1/4 Cup Cinnamon Sugar Blend


   In bowl, whisk together the egg yolks and the sugar until well combined. It should be a creamy light yellow.

In a pot, combine the cream, pumpkin, and spices and whisk together over medium heat. Allow it to just boil and then remove from heat. Add in the vanilla.

 In a slow steady stream pour the cream into the sugar and egg yolks until fully combined. Keep that whisk moving the whole time.

 Evenly distribute the mixture into 8 small ramekins, or 4 larger ones. Either will do just fine. Baking these will require a water bath, I used a roasting pan and filled it halfway up the ramekins with hot water. Bake for 1 hour. Try not to peek during the process! The warm cinnamon scent will make it very tempting. At the one hour mark check your Brulee's.

 They will be set, but slightly "jiggly" in the middle. This is OK! Remove them from the oven and cool out of the water bath at room temperature for 45 minutes to an hour. When they are cool to the touch, transfer to the fridge and leave them for at least 4 hours. Now I was cooking all day and opening and closing that fridge for hours, mine could have rested another hour or two, but we could not wait a second longer to dig in. Try to be more time cautious and give yourself time to let them chill long enough.

 When setup and ready to serve, sprinkle the tops with the cinnamon sugar blend and caramelize the tops with a kitchen torch. For a little more shazam, like cinnamon sugar is not already enough I made these treats a little sweeter by adding some fresh whipped cream and a sprinkle of ground cinnamon. Life really is too short to not add whipped cream!

Sunday, May 4, 2014

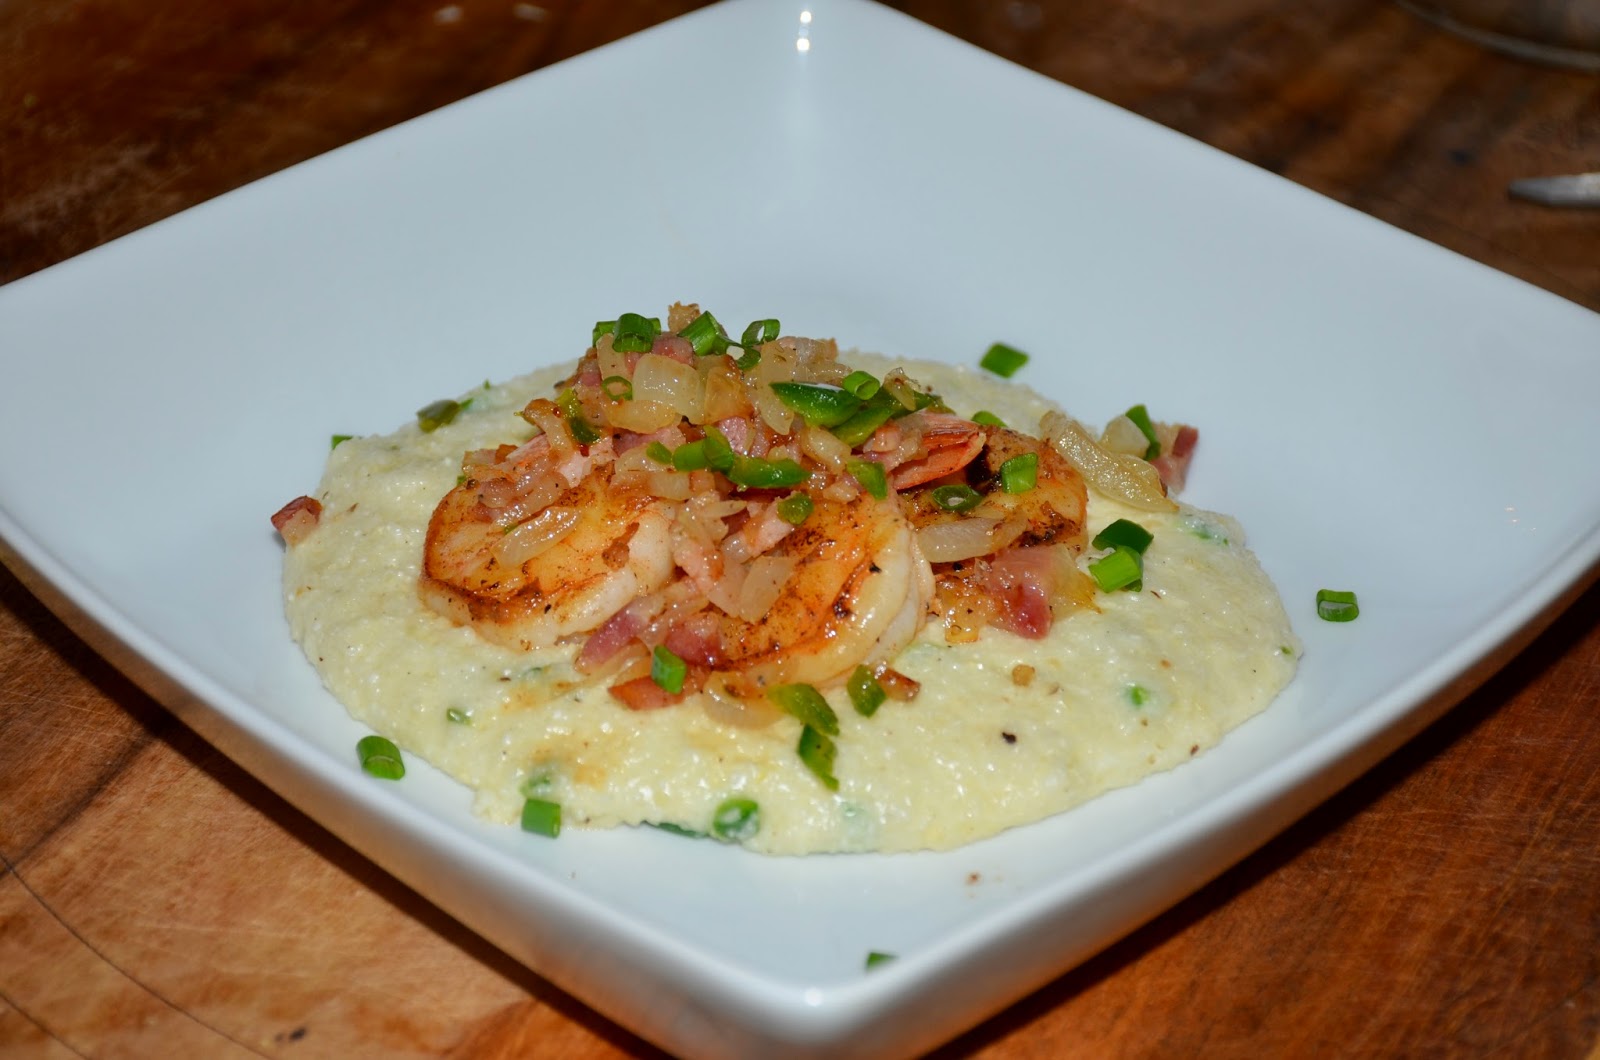
White Cheddar Jalepeno Shrimp and Grits


   Its been a while, but it sure feels good to get on here and start writing. A few of you have been asking about this recipe, beings that we eat this at least twice a month, sometimes more. If you are one of the ones that has not been asking for this, well you are in luck. Shrimp and Grits is such a classy southern dish, grits can be so, just blah, I personally was never a big fan. When you pair them with shrimp, its pure magic. Add a little of this and a little of that and, hallelujah, its delicious, quick and easy.

1 lb Fresh White Shrimp
1/2 Diced Yellow Onion
3 Seeded and Diced Jalepenos
6 Slices Smoked Bacon, Cubed
1/2 Cup Sharp White Cheddar Cheese
1 Tbs Butter
1/4 Cup White Wine
Juice Of Half a Lemon
2 Cups Milk
1/2 Cup Stone Ground Grits
Salt
Fresh Ground Black Pepper
Lemon Pepper
Cayenne Pepper
2 Tbs Heavy Cream

  I start by seasoning the shrimp, make sure they are cleaned, peeled, deveined. I also choose to leave the tails on, but that is just how i prefer to eat shrimp, they could also be taken off. I then season them with Salt, Pepper, Lemon Pepper and a little Cayenne, set aside. Chop and dice the onion, bacon, and jalepenos. Cook the onions, bacon and half the jalepenos until the bacon is crisp and the onions are golden brown. Drain on a paper towel and set aside. In the same pan add the butter, white wine, and lemon juice, cook the shrimp for about 3 to 4 minutes until just cooked through. Shrimp cook quick and easy so keep a close eye on them. For the sinfully creamy spicy grits, boil the milk, add the grits and whisk until thickened, then add the shredded cheddar and the other half of the diced jalepenos and salt and pepper to taste. At the very end, whisk in the heavy cream, that adds the extra creamy goodness to this dish. To plate, a big spoon full of grits, then the shrimp ,top it all off with the bacon and onions and a little fresh chives. Enjoy!

   This meal is so delicious, filling, and impressing for any occasion. A great way to put a little twist on a southern classic. P.S- NEVER and i mean NEVER make your grits with water. Bless your Heart if that is the way you have been making them, STOP NOW!


Tuesday, February 25, 2014

Peanut Butter Banana Chip Muffins

 
     I know Its been too long since I have posted. Things have been crazy around here. The cooking, the pictures, and the "testing the food" is never a problem. Its the turning the computer on, uploading pictures and in my case Internet access. As you can tell these pictures were intended for valentines day. It is now almost March. Anyways, these muffins will be good all year, no matter what holiday is around the corner! They are quick, easy and use only one bowl! Cheers for less dishes!

1 Cup Flour
1/2 Tsp Salt
1/2 Tsp Cinnamon
1/2 Tsp Baking Soda
1/2 Tsp Baking Powder
1/4 Cup Light Brown Sugar
1/4 Cup Sugar
1/4 Cup Melted Butter
1/3 Cup Peanut Butter
1 Beaten Egg
3 Mashed Ripe Bananas
1/4 Cup Chocolate Chips
1/4 Cup Peanut Butter Chips

  Preheat oven to 325 degrees.

  Combine all dry ingredients in a large mixing bowl and whisk together. Now ditch the whisk and get out a good ole fashioned wooden spoon. Add all the wet ingredients and the chips. Mix until just combined. Its fine if the batter is a little lumpy but make sure to not over mix the batter. Line a muffin tin with liners of your choice. Fill them 3/4 of the way full. Bake for about 20 minutes until a toothpick comes out clean and they are golden brown. Enjoy and try not to let your dogs get a hold of these. Of course the last 6 came up missing in my home, but what did appear was a guilty face on a certain great danes face...Happy Belated Valentines Day!
Mmmmm...Peanut Butter, I wonder who licked the spoon?

Monday, December 9, 2013

Creamy BLT Pasta

This is so easy, creamy and delicious, filled with smokey bacon, and tender spinach. It's quick, easy and cheap and can be thrown together in no time at all. 

Creamy BLT Pasta: 
1 cup heavy cream
1/4 cup tomato sauce
1/2 cup fresh diced tomatoes 
2 cups baby spinach
4 strips crumbled crispy bacon
1/4 cup Parmesan Cheese
2tbs vodka 
2 tbs olive oil
Salt
Pepper
Garlic Powder

  Sautée all the spinach except for a 1/2 cup, in the olive oil and seasonings, on medium heat until the spinach is tender but not cooked through. Add everything else and bring to a low boil. Take off the heat and add the remaing spinach. Stir until combined. Pour the sauce over your favorite pasta and serve, maybe will a little extra Parmesan cheese. 

Saturday, November 30, 2013

Pumpkin Waffles with Cider Butter Syrup

Pumpkin Waffles with Cider Butter Syrup


  Today I said goodbye to fall, for my last pumpkin hoorah of the season, and putting my new waffle iron to use. These waffles are full of all of falls flavors, including the cider syrup they are topped with. The perfect   way to bid goodbye to November and hello to December and all of its peppermint mocha goodness. Dear December, i love you, but spiced fall flavors are my favorite. These literally only took me 10 minutes to whip and get on the plate, 1 bowl, 1 saucepan, and 1 waffle iron also mean very little dishes. Who likes to start there morning washing dishes anyway?

 Waffles
1 cup plus 2 tbs Flour
1 tsp. Cinnamon
1/2 tsp. Pumpkin Pie Spice
1 tsp Baking Powder
 1/2 tsp. Salt
1 beaten egg
1 cup buttermilk
2 tbs melted butter

 Mix all ingredients together until well mixed. Do not overmix, a few lumps are ok. Heat Waffle iron and spray with non-stick spray.

Syrup
1/2 cup Sugar
1 tbs Corn Starch
1 tbs Corn Syrup
1 tsp Cinnamon
1 cup Apple Cider
4 tbs Butter

Put a saucepan on med-high heat, add the sugar, corn starch, and cinnamon, whisk until combined. Add the cider and whisk until thick and bubbly, take off the heat and stir in the butter until melted and combined. Top the waffles with the warm syrup and if your feeling spunky, maybe some fresh cinnamon whipped cream, as you can see from the photos, i must have been feeling spunky. May i also add, these are the 1st food photos i have taken with my new Nikon D7000 DSLR camera. Not bad for my first tr,y, I'm sure they will improve more with time, but I'm pretty tickled about these for the time being!

Monday, November 18, 2013

Jalapeño Corn Fritters


 My dad's birthday was last week, so on Saturday, naturally, we celebrated. Tons of snacks and party appetizers, of course homemade by me. I don't mind, I love entertaining, and having people over. Last year I made cornbread stuffed jalapeños, they were good. So good that for these I deconstructed them and made them into something better. 

3 cups sweet whole kernel corn
1/3 cup chopped fresh jalapeños 
1/4 cup chopped onion
1 1/2 cups flour
2 eggs
2 tbs sugar
Splash of milk
Salt 
Pepper
Cayenne pepper 
Garlic powder 

 Combine all the ingredients in a large bowl and fold together until combined. Season with a pinch, or a little more if you like the heat, of the dried spices.  Heat an iron skillet on med-high heat with about a 1/4 inch layer of vegtable oil. Drop the fritter dough in small drops and let cook on one side for about a minute, until it can be flipped without falling apart. Cook on opposite side until golden brown. I let mine drain on a paper towel, then slapped them in a 350 degree oven for 15 minutes to cook thoroughly and keep warm while making a sauce. I used my favorite Cilantro Crema sauce and added a little kick, here is the link to the recipe for the sauce. 

http://www.lifeneedssprinkles.blogspot.com/2013/08/citrus-chicken-tacos-with-cilantro-crema.html?m=1

 For the kick I added a jalapeño to the food processor to turn up the heat a little bit. These fritters were gone in a matter of minutes, a big hit. I also think they could be made ahead of time, be kept frozen, then pop them in to oven before serving to warm and crisp them up. 


Sunday, November 10, 2013

Parmesan Pepper Pasta


 One weekend day, it's noon and we are starving for lunch, not wanting to leave the house to go out for lunch, or shopping to restock our very empty fridge, and pantry. Anthony says "I'll take care of it" He whips up this dreamy pasta with bannana pepper rings, it was good. So good I think I made it for lunch twice the next week. I amped it up a bit and added fresh parmesan, and a blackened chicken breast, and BAM it's a quick, cheap, easy, delicious meal. Although I fully credit this meal to Anthony it was his inspiration that lead me to this pasta dish. 

Fettuccini noodles (or whatever you have on hand will work) 
Chicken Breasts ( I pan seared mine with salt, pepper, garlic and paprika) 
3 tbs butter
1/2 tsp salt 
1/2 tsp cracked black pepper
1/2 tsp garlic powder
1/2 tsp onion powder 
1/4 cup chopped banana pepper rings
1/4 cup Parmesan cheese

 Cook the noodles until right past al dente in salted water. Strain and return to  the pot with all the ingredients. I added more banana rings and cheese. Toss until butter is melted and everything is combined. Top a few slices of chicken and...dinner is served, or lunch, or a snack, or breakfast. This stuff is so good, and it's so cheap and easy anyone could do it. Anthony lived off of something similar through his college days. Enjoy!